
Hook은 최근 리액트 16.8부터 새로 도입된 기술로, Class Component에서만 사용 가능했던 state와 lifecycle을 function component에서도 사용 가능 하도록 제작됐다. 단지 Class component를 function component로 옮기는 것에서 끝난 것이 아닌, 컴포넌트의 state에 관련된 로직을 재사용 할 수 있다는 장점이 있고, 컴포넌트간의 통신을 도우는 Context API등 다양한 발전들이 이뤄졌다.
React v.17 이후부턴 리액트가 공식적으로 Class component를 사용하는 것이 아닌, Functional Component를 사용하라고 권장했다. 따라서 외부 라이브러리부터 다양한 프로젝트에서도 Functional component와 hook, lifecycle이 사용 되면서 꼭 알아야하는 지식으로 자리 잡았다.
Basic Hooks
import React from "react";

export default class Example1 extends React.Component {
  state = {
    count: 0,
  };

  render() {
    const { count } = this.state;
    return (
      <div>
        <p>You clicked {count} times</p>
        <button onClick={this.click}>Click me</button>
      </div>
    );
  }
  click = () => {
    this.setState({
      count: this.state.count + 1,
    });
  };
}- 원래 Class component로 State를 바꿀 땐, 다음과 같은 방식으로 우리가 직접 만들어 놓은 state안에 count 값을 바꿀 수 있도록 this.setState를 통하여 값을 변경 해 주었다.
useState
import React, { useState } from "react";

export default function Example2() {
  const [count, setCount] = useState(0);
  return (
    <div>
      <p>You clicked {count} times</p>
      <button onClick={click}>Click me</button>
    </div>
  );
  function click() {
    setCount(count + 1);
  }
}- 앞서 제작 하였던 class component와 완전히 동일한 역할을 하는 function component를 만들어 보았다.
- 원래 state를 만들어서 사용했던 것이 이상하게 배열 형태로 된 변수와 useState같은 함수를 사용하고 있다.
- 다음 코드는 다음 역할을 한다.
const [변수명, 값을 바꿀 수 있는 함수명] = useState(초기값);- 대괄호 첫번째 값은 우리가 state 때 처럼 사용할 변수명을 작성 해준다.
- 대괄호 두번째 값은 첫번째 값인 변수의 값을 바꾸려고 할 때 사용하는 함수의 이름을 작성하여 준다.
- useState 뒤의 값은 초기 값을 의미한다.
function click() {
	setCount(count + 1);
}- 변수 값을 바꾸려고 할 때 사용하는 함수를 사용하여 count 값을 1씩 올려주도록 앞서 작성한 class Component의 setState와 같은역할을 할 수 있도록 만들어 주었다.
그리고 보통 useState는 원래 우리가 사용하던 state 관리법과 같이 객체로 담아서 사용 하는 경우가 많다.
import React, { useState } from "react";

export default function Example3() {
  const [state, setState] = useState({ count: 0 });
  return (
    <div>
      <p>You clicked {state.count} times</p>
      <button onClick={click}>Click me</button>
    </div>
  );
  function click() {
    setState({ count: state.count + 1 });
  }
}- 다음과 같이 count를 state로, setCount를 setState로 값을 바꾸어 state를 관리하는 변수와 함수라는 것을 명시 해 주었고, useState안에 객체를 담아 초기 값을 객체 형태로 만들어 주었다.
- 또한 마찬가지로 state의 값을 바꾸는 함수인 setState또한 객체 형태로 바꿀 수 있게 제작 해 주었다.
- 그리고 보통 setState는 저렇게 직접적으로 값을 바꾸지 않고 의존적으로 바꾸기 위해 함수를 따로 만들어 바꾸어 준다.
setState((state) => {
  return {
    count: state.count + 1,
  };
});
- 클래스 컴포넌트를 잘 사용하고 있었는데 왜 useState가 생겨나서 stateless component였던 function component를 사용 하게 되었을까요?
- 컴포넌트 사이에서 상태와 관련된 로직을 재사용하기가 어렵다.
- props말고 state와 관련된 로직을 말한다.
- 복잡한 컴포넌트들은 이해하기 어렵다.
- 컴파일 단계에서 코드를 최적하기가 어렵다.
- this.state는 로직에서 레퍼런스를 공유하기 때문에 문제가 발생 할 수 있다.
- 컴포넌트 사이에서 상태와 관련된 로직을 재사용하기가 어렵다.
useEffect
useState는 기존 class component의 state를 대체 했다면 useEffect는 라이프 사이클 훅을 대체 할 수 있다.
- 다음 라이프 사이클 훅을 대체 할 수 있다.
- componentDidMount
- componentDidUpdate
- componentWillUnmount
import React from "react";

export default class Example4 extends React.Component {
  state = {
    count: 0,
  };

  render() {
    const { count } = this.state;
    return (
      <div>
        <p>You clicked {count} times</p>
        <button onClick={this.click}>Click me</button>
      </div>
    );
  }

  componentDidMount() {
    console.log("componentDidMount", this.state.count);
  }

  componentDidUpdate() {
    console.log("componentDidUpdate", this.state.count);
  }

  click = () => {
    this.setState({
      count: this.state.count + 1,
    });
  };
}
- 다음과 같이 class component에서 사용했던 componentDidMount와 componentDidUpdate를 function component에서 사용하는 방법을 알아봅시다.
import React, { useState, useEffect } from "react";

export default function Example5() {
  const [count, setCount] = useState(0);

  useEffect(() => {
    console.log("componentDidMount & componentDidUpdate", count);
  });

  return (
    <div>
      <p>You clicked {count} times</p>
      <button onClick={click}>Click me</button>
    </div>
  );
  function click() {
    setCount(count + 1);
  }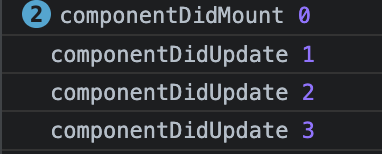
}- React 라이브러리의 useEffect를 사용하여 component가 마운트 되었을 때와 업데이트 될 때 동시에 다 알 수 있습니다.
useEffect(() => {
	console.log("componentDidMount & componentDidUpdate", count);
});- useEffect(React.EffectCallback, React.DependencyList)가 인자로 받게 되어있다.
- 우리가 작성 한 코드에는 Callback 함수 밖에 없다. 그럼 DependencyList는 무엇을 의미하는 것일까?
useEffect(() => {
    console.log("componentDidMount & componentDidUpdate", count);
}, []);- 뒷 인자로 배열을 넣으면 최초 즉 DidMount 단계에만 콘솔이 출력된다.
- 앞서 작성한 코드같이 DependencyList가 들어올 인자에 아무것도 들어오지 않는다면 DidMount와 DidUpdate 모두 다 callback 함수가 실행 된다.
useEffect(() => {
	console.log("componentDidUpdate by count", count);
}, [count]);- 다음과 같이 배열에 count 값을 넣으면 count 값이 변동 할 때 마다 console.log에 코드를 찍어주게 된다.
- 따라서 대괄호 안에 값을 넣으면 그 값이 변동 할 때만 useEffect 안의 콜백 함수가 작동 한다는 뜻이다.
레퍼런스
'프론트엔드 개발 > React' 카테고리의 다른 글
| [React] useEffect와 친해지기 (Side Effect) (0) | 2023.06.11 |
|---|---|
| [알고 쓰자] React 작동 원리 (0) | 2023.03.08 |
| [React] Higher Order Component (0) | 2022.07.11 |
| [React] Styled Components (0) | 2022.07.06 |
| [React] Router - JSX로 라우팅 이동하기 (0) | 2022.07.05 |